


EComposer is #1 Drag & Drop Page Builder that helps you create professional Shopify websites without any coding. Provide 100+ design elements and 300+ templates, there’s no limit to what you can build. Install EComposer for free today and start building the store you’ve always wanted.
How to Change Shipping on Shopify: Just a Few Clicks
Table Of Contents
Flexible shipping options are pivotal in increasing sales and improving customer satisfaction. Store owners on Shopify are able to better meet a variety of customer needs and enhance the overall buying experience by providing a variety of delivery options.
In this blog, "How to Change Shipping on Shopify: Just a Few Clicks", we'll walk you through the straightforward process of updating your shipping settings. To maximize your store's productivity and guarantee that clients receive their goods conveniently, you must become proficient in these adjustments.
Understanding Shipping Settings on Shopify

Shopify's shipping settings provide a comprehensive framework for managing your store's delivery options. By creating rates that differ based on weight, cost, or distance, as well as shipping zones that are targeted at particular areas, you may personalize delivery. With local, expedited, and regular shipping choices among others, Shopify gives you the flexibility to satisfy a wide range of customer needs and preferences.
The performance of your shop and the experience of your customers are greatly impacted by these delivery alternatives. Giving customers clear and flexible shipping options would improve their entire purchasing experience and maybe draw in more devoted and happy customers. Because customers are more likely to finish their orders when they see shipping alternatives that fit their requirements and budgets, efficient shipping settings may also lower cart abandonment and increase conversion rates.
How Does Shopify Shipping Work?

To use Shopify Shipping, go to your admin panel, select Settings, and then Shipping. Ensure all your products have accurate dimensions and weights entered for optimal performance.
After setting up your carriers, you can begin fulfilling orders. Unless you choose the $20/month real-time rate add-on or the Advanced Shopify plan, customers will only see the shipping prices you manually select.
Shopify Shipping offers key features for small businesses:
- Carrier Integrations: Get real-time rates from DHL, USPS, and UPS.
- Bulk Fulfillment: Process orders in bulk and buy shipping labels directly.
- Label Printing: Print multiple labels at once.
- Shipping Insurance: Protect your parcels against loss or damage.
- Flexible Rates: Choose between flat or calculated shipping rates.
- Customer Updates: Provide tracking and real-time updates.
- International Shipping: Auto-generate customs details for international orders.
Additionally, Shopify Shipping provides discounted rates with major carriers, which can benefit users on higher-tier plans. For detailed information, refer to Shopify's guide.
How to Change Shipping on Shopify?
Accessing Shipping Settings
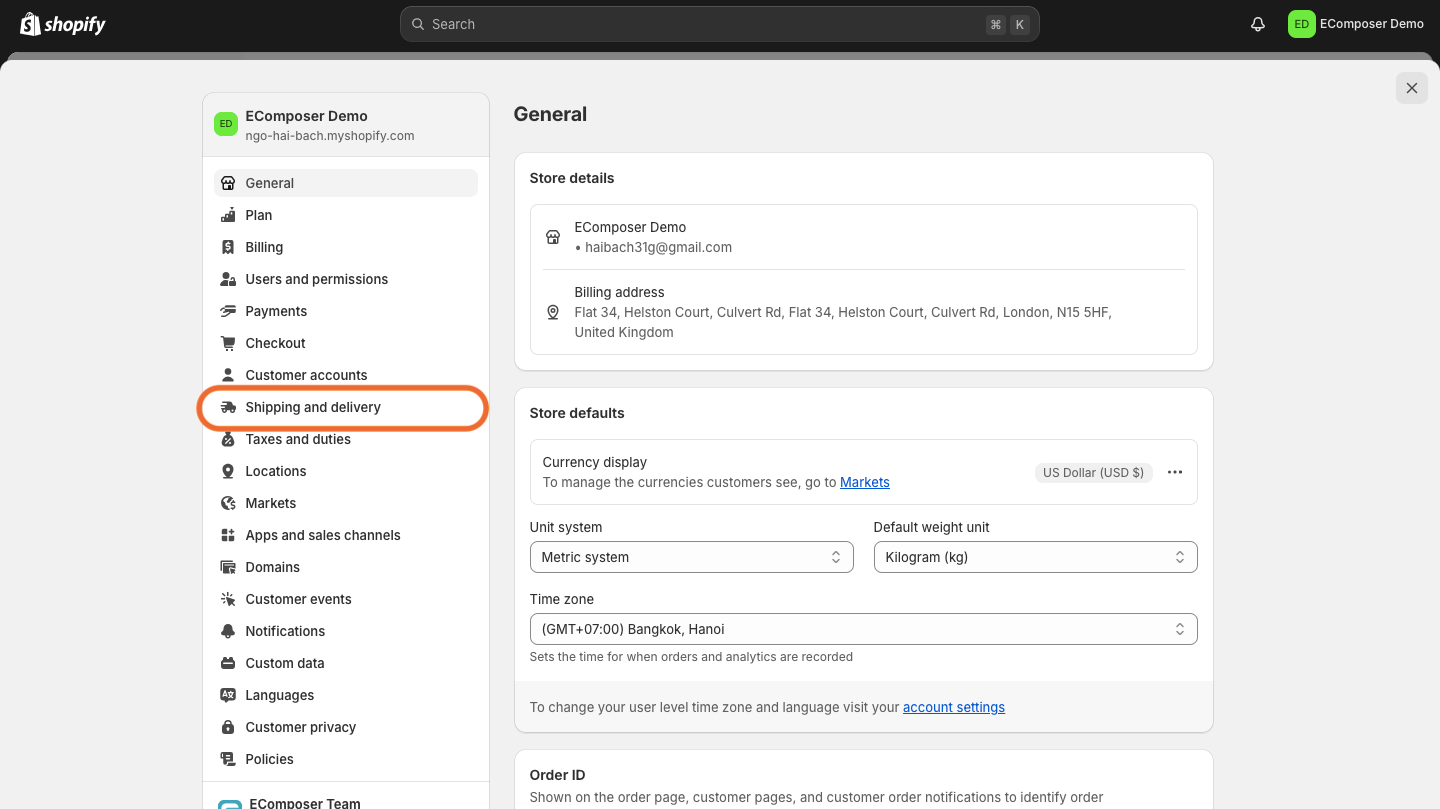
To begin adjusting your shipping settings on Shopify, log into your Shopify admin panel using your credentials. Once you're in the admin dashboard, look for the Settings option in the lower-left corner of the screen. Click on Settings to open a menu of configuration options. From this menu, select Shipping and Delivery. This will direct you to the Shipping settings page, where you can view and modify your shipping profiles, rates, and zones to better suit your business needs.

Changing Shipping Rates
Step 1: Click the shipping profile
Navigate to Settings > Shipping & Delivery in your Shopify admin panel. In the Shipping section, locate and click on the shipping profile where you want to adjust rates. This will open the details of the selected profile.
Step 2: Go to Manage Rates.
Within the chosen shipping profile, find and click on Manage Rates. This option lets you view and modify the current shipping rates associated with the profile.

Step 3: Choose the ⋯ button.
Next to the shipping rate you want to change, click the ⋯ button. This will bring up a menu where you may change the rate with more possibilities.
Step 4: Select Edit Rate
From the menu that appears, select Edit rate. This will take you to a page where you can update the details of the selected shipping rate.

Step 5: Make any changes that you wish to make
On the Edit rate page, adjust the rate as needed. You can modify rate amounts, conditions, or shipping methods. Ensure the changes align with your shipping strategy and customer requirements.
Step 6: Click Done
After making the necessary changes, click Done to save your updates. Finally, click Save to apply and confirm the new shipping rates.

Editing Shipping Zones
Step 1: Choose the shipping profile that you want to edit
To access the Settings > Shipping & Delivery section, log into your Shopify admin panel. In the Shipping section, locate the shipping profile you wish to adjust. This profile encompasses the shipping rules and zones applicable to your store. Click on the profile to open its settings for further modifications.
Step 2: Click the "..." button.
Within the selected shipping profile, identify the shipping zone you need to edit. Next to this zone, you'll find a button with three dots (the ... button). Click this button to open a menu of options specific to that shipping zone.
Step 3: Select Edit zone
In the menu that appears, select Edit zone. This action will take you to a page where you can adjust the parameters of the selected shipping zone. Here, you can change details such as the geographical areas covered by the zone or its shipping rates.

Step 4: Make any changes that you wish to make
On the Edit zone page, proceed to modify the shipping zone according to your requirements. You can adjust which regions are included in the zone, update shipping rates, or change any other settings related to this shipping zone. Ensure all adjustments reflect your current shipping policies and customer needs.
Step 5: Choose Done
After making the necessary changes, click Done to finalize your updates. This will return you to the previous screen, where you can review your changes. Remember to click Save to apply and confirm the new settings for the shipping zone.

Saving and Testing Changes
After updating your shipping settings, testing them thoroughly to ensure they work as expected is essential. Start by placing a test order on your Shopify store, simulating an authentic customer experience. Proceed through the checkout process, selecting different shipping methods and destinations to verify how the new rates and options are applied.

Next, check that the shipping methods you configured are correctly displayed and that the rates match what you set up. Look for discrepancies or errors in the calculations and ensure the rates adjust appropriately based on various shipping zones or conditions.
Finally, evaluate the overall checkout experience to ensure the shipping options are straightforward and user-friendly. This testing helps confirm that your shipping settings are correctly implemented, providing customers with a seamless and trouble-free ordering experience.
Pro Tips: Best Practices for a Flawless Shipping Experience

Custom Profiles for Maximum Control
Create custom shipping profiles for different product categories or customer segments to gain precise control over your shipping options. This allows you to set specific rates and rules tailored to various types of products or regions, ensuring that your shipping policies align with your business needs and customer expectations.
Strategic Free Shipping Offers
Leverage free Shipping offers strategically to boost sales and attract customers. Consider implementing free shipping thresholds, such as a minimum purchase amount, or offering free Shipping on select items or during promotional periods. This can incentivize larger orders and enhance customer satisfaction, driving more traffic to your store.
Offering a Smorgasbord of Shipping Options
Offer a range of delivery choices to accommodate a wide range of consumer preferences. If applicable, offer standard, expedited, and express shipping methods and local delivery or pickup options. This selection meets a range of demands and price points, facilitating the process for clients to select the delivery option that best fits their needs.
Streamlining with Automation
Utilize automation tools to streamline your shipping processes. Time may be saved and human error can be decreased with automated functions including rate computations, order tracking updates, and shipping label creation. When you integrate these solutions into your workflow, productivity rises and the shipping process becomes more seamless for both you and your clients.
Continuous Improvement: Regularly Review and Optimize
Review your shipping settings and performance regularly to identify areas for improvement. Refine your methods by examining delivery times, expenses associated with shipping, and consumer feedback. Sustaining a high level of service, being competitive, and accommodating evolving client demands are all made possible by ongoing optimization.
Common Issues and Troubleshooting

Shipping Rates Not Updating
If your shipping rates aren't reflecting correctly, ensure you've saved your changes after updating the rates. Double-check that your shipping profile settings are applied to the correct products or zones. Review your shipping rules and conditions for errors or conflicting settings if the issue persists. Sometimes, it helps to clear your browser's cache or refresh your admin panel to see if the changes take effect.
Incorrect Shipping Calculations
Inaccurate shipping charges can stem from several issues. Verify that the weights and dimensions of your products are entered correctly in your Shopify admin. Ensure that your shipping rate settings are configured based on the correct criteria, such as weight, price, or destination. If calculations are still off, check for any overlaps or conflicts in your shipping zones and rates. It's also helpful to perform a test checkout to see if the issue replicates and adjusts accordingly.
Handling Shipping Restrictions
Managing shipping restrictions for certain regions can be challenging but is crucial for maintaining a smooth operation. Create custom shipping zones and set appropriate rates or exclusions for areas with higher shipping costs or specific restrictions. Consider offering alternative shipping options or adjusting rates to accommodate these areas. Communicate clearly with your customers about shipping limitations or additional fees to ensure understanding and enhance their overall experience.
Read more:
- 15 Best Shopify Shipping Policy Templates
- How to Disable Shipping on Shopify Store?
- 4 Methods to Add Free Shipping on Shopify
- How to Setup Shopify International Shipping
- 3 Steps To Set Up Shopify Shipping: Tips & Troubleshooting
FAQs
How do I add free shipping options on Shopify?
To add free shipping options on Shopify, choose Settings > Shipping & Delivery from the Shopify admin panel. Select the shipping profile you want to modify and click on Manage Rates. Here, you can add a new shipping rate by choosing Add rate and setting it to $0. You can also set conditions for free Shipping, such as a minimum order amount, by configuring the appropriate rules.
Can I set different shipping rates for different products?
Using custom shipping profiles, you can set different shipping rates for other products. Go to Settings > Shipping and Delivery in your admin panel and create or edit shipping profiles. You can assign specific products or product types to these profiles and set unique shipping rates based on the product's weight, price, or other criteria.
How do I offer local pickup as a shipping option?
To offer local pickup:
- Go to the Shopify admin panel's Settings > Shipping & Delivery section.
- Under the relevant shipping profile, click Manage Rates and then Add rate.
- Select Local pickup from the options provided and configure the details, such as pickup locations and any associated fees.
- Ensure you communicate clearly with customers about the pickup process and location.
What should I do if my shipping rates aren't displaying correctly?
If your shipping rates aren't displaying correctly, first verify that they are set up correctly in Settings > Shipping and Delivery. Check for errors in the rate conditions or conflicts with other shipping rules. Also, ensure that you've saved your changes and cleared your browser's cache. Conduct a test order to see if the issue persists, and adjust settings as needed.
How can I manage international Shipping on Shopify?
To manage international Shipping:
- Access the Shopify admin interface by going to Settings > Shipping & Delivery.
- Create or edit shipping zones to include international regions and set appropriate shipping rates for these zones.
- Ensure that you configure customs details and handling fees if applicable.
Shopify also integrates with various international carriers to streamline the shipping process for global orders.
Conclusion
Modifying shipping zones and rates, gaining access to the shipping settings through your admin panel, and carefully verifying your modifications to guarantee correctness are the three main processes involved in changing your shipping settings on Shopify. Your store's shipping efficiency and customer happiness may be improved by adhering to best practices, which include leveraging automation, providing a variety of delivery alternatives, and generating bespoke shipping profiles.
Regularly reviewing and optimizing your shipping settings is crucial for maintaining a smooth and effective operation. Monitor shipping performance and customer feedback to make necessary adjustments and stay competitive. By consistently refining your shipping strategy, you'll improve your customers' experience and drive better sales and overall store success.


0 comments